The safety of your 4000m climb depends less on your gear’s price tag and more on your understanding of its critical failure points.
- Layering systems fail from the inside out due to trapped moisture, rendering expensive shells useless.
- Mountaineering boots must be sized for descent, not just ascent, to prevent trip-inducing toe injuries.
- Used safety hardware like carabiners can hide invisible, catastrophic micro-fractures.
Recommendation: Audit your gear for system integrity and potential failure points, not just brand names.
As an aspiring mountaineer, you stand at a crossroads. In one hand, the glossy catalog promises that a $500 shell jacket is the key to conquering a 4000-meter peak. In the other, your budget demands careful, value-conscious decisions. The market is flooded with advice that often equates higher cost with greater safety, pushing novices toward expensive purchases that may not address the real risks of alpine environments. This approach is not only financially inefficient; it’s dangerously incomplete.
The common wisdom to “buy the best boots” or “get a good layering system” scratches the surface but fails to explain the mechanics of failure. True preparedness for high-altitude conditions doesn’t come from a brand logo or a price tag. It comes from a deep, objective understanding of your equipment as an interconnected system. Safety is a function of knowledge: knowing how your gear is supposed to work, why it fails, and how to maintain its performance when you are thousands of meters above sea level.
This guide deliberately bypasses brand recommendations and generic checklists. Instead, we will dissect the most common yet overlooked failure points in an essential 4000m kit. The real question isn’t *what* to buy, but *how* to ensure the systems you rely on for survival—from moisture management to fall protection—perform as intended. By focusing on system integrity and failure-point analysis, you can build a kit that is not only cost-effective but fundamentally safer.
This article provides a detailed analysis of the crucial gear systems required for high-altitude mountaineering. The following sections break down the specific technical knowledge you need to make informed, safe, and budget-conscious decisions for your kit.
Summary: A Technical Guide to Essential Mountaineering Gear for 4000m Peaks
- Why a $500 Shell Jacket Fails Without the Correct Base Layer?
- How to Size Mountaineering Boots to Prevent Toe Bang on Descents?
- Automatic vs Semi-Auto Crampons: Which Fits Your Current Boot?
- The Invisible Micro-Fractures in Used Carabiners That Risk Failure
- When to Re-waterproof Your Gore-Tex Gear to Restore Breathability?
- How to Cut 2kg from Your Base Weight Without Sacrificing Safety Gear?
- Wool or Synthetics: Why Nomads Wear Heavy Layers in 40°C Heat?
- Preparing for High-Altitude Alpine Trekking: Timelines for Beginners Over 40?
Why a $500 Shell Jacket Fails Without the Correct Base Layer?
The primary failure point of a high-end waterproof-breathable shell jacket isn’t external rain; it’s internal moisture. Your body produces a significant amount of sweat during strenuous alpine ascents. If this water vapor is trapped against your skin, it negates the insulating properties of your mid-layers and dramatically accelerates heat loss. This internal saturation is where the system integrity of your layering breaks down. A high-tech shell is only as good as the base layer beneath it.
A cotton or poor-quality synthetic base layer acts like a sponge, holding moisture directly against your skin. Once saturated, it cannot transfer vapor to the outer layers, effectively shutting down the breathability of your expensive shell. The shell’s membrane, no matter how advanced, cannot pull moisture through a saturated fabric. The result is a self-inflicted microclimate of cold, damp air, where your body burns critical energy just to stay warm. Indeed, research shows that the body burns thousands of extra calories when dealing with moisture-soaked base layers at altitude.
As the illustration shows, this creates a catastrophic performance delta: you paid for a breathable system but are getting the performance of a cheap plastic poncho. The solution is to prioritize a high-performance, wicking base layer made from merino wool or a quality technical synthetic. This first layer is the engine of your moisture management system. Its job is to pull sweat off your skin and push it outward, allowing your mid-layer and shell to complete the transport of vapor into the atmosphere. Investing $100 in an excellent base layer does more for your warmth and safety than upgrading from a $300 to a $500 shell jacket.
How to Size Mountaineering Boots to Prevent Toe Bang on Descents?
While most beginners focus on comfort during the ascent, the true test of a mountaineering boot’s fit is on the long, punishing descent. “Toe bang”—the painful, repeated impact of your toes against the front of the boot—is more than a simple discomfort. It’s a significant hidden liability that can compromise your entire expedition. The resulting bruised or lost toenails are just the beginning of the problem.
The real danger lies in how your body compensates for the pain. As a guide from Adventure Peaks points out, this issue directly impacts your stability on technical ground. It highlights a critical, often-overlooked safety aspect:
Bruised toes are a critical safety issue, not a comfort one. They alter your gait, causing instability and overcompensation, which dramatically increases the risk of tripping on technical terrain.
– Adventure Peaks Mountain Guides, Boot Selection Guide for 4000-6000m Peaks
To prevent this, you must size your boots specifically for descents. Your foot will naturally slide forward inside the boot on steep downhills. There must be enough room to accommodate this movement without your toes hitting the end. The standard rule is to allow for one finger’s width (about 1-1.5 cm) of space between your longest toe and the end of the boot when your heel is pushed to the back. When lacing the boots, focus on locking your heel securely into the back of the boot to minimize forward slide. This is often achieved by using specific lacing techniques that tighten the ankle area independently.
You can verify the correct size at home with a simple method. Stand on a piece of paper with your full weight on your foot and trace its outline. Measure the longest part of your foot in millimeters. When trying on boots, remove the insole and place your foot on it. You should have that crucial 1-1.5 cm of space between your toe and the end of the insole. This simple check is far more reliable than just judging comfort while walking on a flat surface.
Automatic vs Semi-Auto Crampons: Which Fits Your Current Boot?
Choosing the right crampons is not a matter of preference; it is a technical decision dictated entirely by the boots you own. A mismatch between your boot and crampon is a direct path to catastrophic failure, as accident reports show a long list of tragedies stemming from gear issues, including sudden crampon detachment on steep ice. Understanding the compatibility of your system is a non-negotiable element of safety.
The interface between boot and crampon depends on “welts”—the rigid ledges on the toe and heel of the boot designed as attachment points. There are three main boot categories, and each corresponds to a specific type of crampon:
- Boots with no welts: These are typically lighter hiking or trekking boots. They can only accept universal (or strap-on) crampons, which use a system of flexible straps to attach. These are the least secure and are not suitable for technical, steep terrain.
- Boots with a heel welt only: These are the most common type of all-around mountaineering boots. They are designed for semi-automatic (or hybrid) crampons, which use a lever at the heel and a strap basket at the toe. This provides a secure and reliable fit for general mountaineering and moderate ice.
- Boots with both a toe and heel welt: These are stiff, technical boots built for ice climbing and high-altitude mountaineering. They accept automatic (or step-in) crampons, which feature a heel lever and a wire bail at the toe. This is the most secure and rigid attachment system available.
Attempting to fit a crampon to an incompatible boot—for example, trying to mount an automatic crampon on a boot with only a heel welt—will result in a loose, unstable connection that is guaranteed to fail under load. The choice is made for you by your boot’s design.
This table outlines the direct relationship between boot type and crampon compatibility, a critical piece of information for any aspiring mountaineer assembling their kit.
| Boot Welt Type | Compatible Crampon Type | Security Level | Best Use Case |
|---|---|---|---|
| No Welt | Universal/Strap-on | Less Secure | Occasional use, approach |
| Heel Welt Only | Semi-automatic/Hybrid | Moderate | Mixed terrain, moderate ice |
| Toe & Heel Welt | Automatic/Step-in | Most Secure | Technical ice, steep terrain |
The Invisible Micro-Fractures in Used Carabiners That Risk Failure
For a budget-conscious mountaineer, the market for used gear can be tempting. While items like jackets or backpacks can be excellent second-hand purchases, you must exercise extreme caution with any “hard goods”—the metal equipment that makes up your safety system, especially carabiners. The most significant danger is not visible damage but the hidden liability of micro-fractures. A carabiner that appears perfectly functional to the naked eye could be dangerously compromised.
Carabiners are rated to withstand immense forces, but a significant impact, such as being dropped from a height onto a hard surface, can create invisible stress fractures in the aluminum alloy. These micro-fractures compromise the structural integrity of the metal, dramatically lowering the force required to cause catastrophic failure. Since you can never know the full history of a used carabiner, you are inheriting an unknown level of risk. The small amount of money saved is not worth the potential for a life-threatening gear failure.
Even with your own gear, regular inspection is critical. Wear and tear from normal use can also create hazards. Rope friction can wear grooves into the carabiner’s surface, creating sharp edges that can damage or even sever a rope under load. Corrosion, gate-flutter, or a weak spring are all signs that a carabiner should be retired immediately. Your life depends on the flawless function of every link in your safety chain. A rigorous, hands-on inspection protocol is not optional.
Action Plan: Personal Carabiner Inspection Protocol
- Gate Flutter Check: Hold the carabiner’s body and shake it vigorously. Any audible rattle or “flutter” from the gate indicates wear in the hinge pin or spring, and the carabiner should be retired.
- Spring Tension Test: Open and release the gate rapidly 10-15 times. It should snap shut crisply and completely every time. Any sluggishness, sticking, or failure to fully close means it is unsafe.
- Surface Integrity Scan: Run your fingers slowly along all rope-bearing surfaces. Feel for any sharp grooves, burrs, or nicks worn by the rope. A groove deeper than 1mm is a clear retirement sign.
- Corrosion and Deformation Inspection: Visually inspect the entire carabiner, paying close attention to the hinge and locking mechanism for any signs of corrosion. Check the spine and gate for any bending or misalignment.
- Gate Alignment Verification: Close the gate and look at it from the side. Ensure the nose of the gate aligns perfectly with the carabiner body. Any offset indicates potential deformation from a damaging impact.
When to Re-waterproof Your Gore-Tex Gear to Restore Breathability?
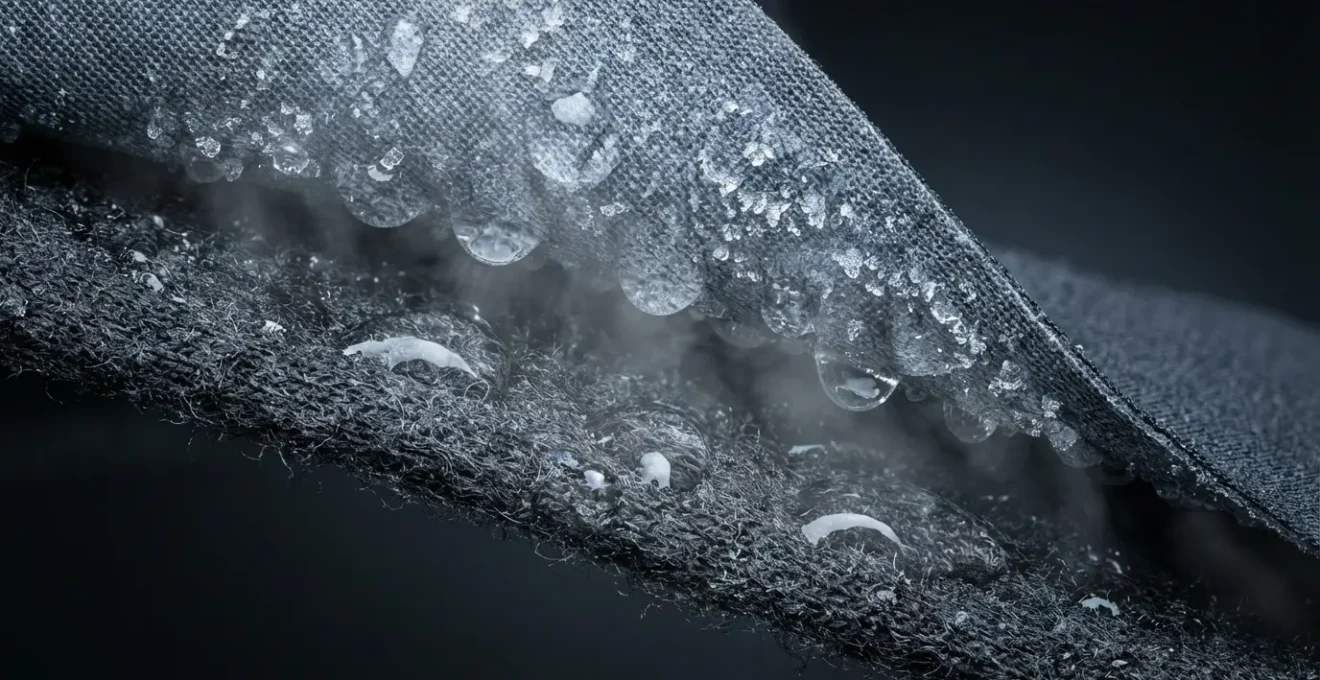
A common misconception is that re-waterproofing a shell jacket is about stopping leaks. In reality, the primary goal is to restore its breathability. Modern shells like those made with Gore-Tex have a waterproof membrane that is responsible for keeping water out. However, the outer face fabric is treated with a Durable Water Repellent (DWR) finish. The function of DWR is to make water bead up and roll off the surface.
When the DWR wears off, the outer fabric “wets out”—it becomes saturated with water. Although the internal membrane will still prevent this water from reaching you, the saturated face fabric completely blocks the escape of your body’s water vapor. The jacket stops breathing. This traps sweat inside, leading to the same chilling effect as a faulty base layer, and a massive loss in thermal efficiency. Restoring the DWR is therefore critical for maintaining the entire layering system’s integrity.
You know it’s time to treat your gear when water no longer beads on the surface. If you see dark, damp patches appearing on your jacket’s fabric during a rain shower, the DWR has failed in those areas. The restoration process is straightforward:
- Clean the Garment: First, wash your jacket with a technical cleaner specifically designed for outdoor gear. Regular detergents can leave behind residues that inhibit DWR performance.
- Apply Heat: Often, the original DWR can be reactivated simply by applying low, gentle heat. Tumble dry your garment on a low setting for 20-30 minutes.
- Re-apply a DWR Treatment: If washing and drying don’t restore beading, it’s time to use a spray-on or wash-in DWR product. Follow the product’s instructions carefully, ensuring even application. A final low-heat tumble dry will help the new treatment bond to the fabric.

A properly functioning DWR, as shown by the perfect beading in the image, is a sign of a healthy, breathable shell. This simple maintenance can make a used, well-cared-for jacket perform better than a new, neglected one, offering significant value and performance for the budget-conscious climber.
How to Cut 2kg from Your Base Weight Without Sacrificing Safety Gear?
In mountaineering, weight is a currency of energy. Every gram you carry must be justified, as it depletes the reserves you’ll need for a safe return journey. The descent is statistically the most dangerous part of any climb, and fatigue is a major contributing factor. As studies indicate that every 100g saved reduces fatigue and preserves strength, optimizing your efficiency-to-weight ratio is a critical safety discipline, not a luxury.
Cutting significant weight doesn’t mean leaving behind your helmet or first-aid kit. It means adopting a philosophy of multi-functionality. The most effective way to lighten your pack is to select items that can serve two or more purposes, thereby eliminating redundant gear. This requires a creative and analytical approach to your kit, looking for synergies between items.
Instead of thinking in terms of individual items, think in terms of functions. Do you need a separate camp pillow, or can you use your down jacket stuffed into its sack? Can your trekking poles double as the structural support for your minimalist shelter? This mindset shifts the focus from simply buying “ultralight” (and often ultra-expensive) gear to building a smarter, more integrated system. Here are some practical examples of multi-functionality in action:
- Pack & Sit-Pad: Use a foam sit-pad, which weighs almost nothing, as the back panel of a simple, frameless backpack. It provides structure and comfort while serving its primary function at camp.
- Trekking Poles & Tent: Choose a shelter that is designed to be pitched using trekking poles, eliminating the need for dedicated tent poles and saving hundreds of grams.
- Helmet & Basin: In a pinch, a climbing helmet can be used as a basin to collect water or as a bowl for a meal, eliminating the need for a separate container.
- Rope & Guyline: Your climbing rope can be used as an emergency guyline to reinforce a tent during an unexpected storm.
- Down Jacket & Pack Size: Selecting a highly compressible down or synthetic jacket allows you to use a smaller, and therefore lighter, backpack.
Wool or Synthetics: Why Nomads Wear Heavy Layers in 40°C Heat?
The choice between wool and synthetics for a base layer seems simple in a cold environment. Both have excellent properties, though as Smile Mountain Guides note, ” Wool retains heat when wet, so the heavyweight option provides the most warmth,” making it a reliable choice for alpine conditions. However, to truly understand fabric performance, it’s useful to look at an extreme, counter-intuitive example: nomads in hot deserts wearing heavy wool layers.
The principle at play is the creation of a stable microclimate. In intense, dry heat, the body’s primary cooling mechanism is the evaporation of sweat. Wearing a thin, light layer allows this to happen too quickly, offering no buffer from the scorching sun and leading to rapid dehydration. A loose-fitting, heavy wool garment works differently. Firstly, the thick fabric acts as a formidable barrier against direct solar radiation, preventing the skin from absorbing that heat.
Secondly, and most importantly, it manages moisture in a controlled way. As you sweat, the wool absorbs the moisture. Instead of instantly evaporating, this moisture is held within the fabric’s structure, away from the skin. The intense external heat then causes this trapped moisture to evaporate *slowly* from the outer surface of the garment. This slow evaporation creates a cooling effect, much like an evaporative cooler, and maintains a more stable, cooler, and more humid layer of air next to the skin. This protects the wearer from both overheating and dehydration. It’s a perfect example of a fabric system creating a performance advantage in extreme conditions.
While mountaineering above 4000m is primarily a cold-weather challenge, this principle reinforces the importance of your base layer as a microclimate regulator. Whether you choose wool or a high-end synthetic, its job is not just to wick sweat, but to manage the thermal and moisture environment directly next to your skin. This deep understanding of fabric science allows you to make better choices for all conditions.
Key Takeaways
- System Integrity Over Price: The performance of your gear depends on how well it works together, not the cost of individual items. A faulty base layer can disable a $500 shell.
- Fit is a Safety Function: Improperly sized boots and incompatible crampons are not just uncomfortable; they are direct causes of instability and catastrophic gear failure on technical terrain.
- Maintenance is Performance: Your gear’s effectiveness degrades over time. Regularly inspecting hardware for hidden damage and restoring DWR on shells are as crucial as the initial purchase.
Preparing for High-Altitude Alpine Trekking: Timelines for Beginners Over 40?
For the aspiring mountaineer over 40, enthusiasm and fitness are key, but they must be paired with a deliberate and well-paced preparation strategy. The body’s ability to adapt to new stresses—from breaking in stiff boots to building high-altitude resilience—benefits from a longer, more gradual timeline. Rushing the process increases the risk of overuse injuries and gear-related problems on the mountain.
The relationship between your preparation timeline and your budget is a critical strategic consideration. A longer lead time not only allows for more thorough physical conditioning but also enables smarter, more economical gear acquisition. You can wait for seasonal sales, research a wider range of options, and, most importantly, have ample time to test every piece of your kit extensively.
This matrix provides a framework for how different timelines impact both your budget and your preparation strategy, allowing you to choose an approach that aligns with your personal circumstances.
| Timeline | Budget Required | Key Activities | Advantages |
|---|---|---|---|
| 6 Months | Lower | Gradual gear acquisition, wait for sales | Spread costs, thorough testing |
| 3 Months | Moderate | Focused training, essential gear only | Balanced approach |
| 1 Month | Higher | Intensive prep, premium gear purchase | Quick readiness, latest equipment |
Beyond purchasing, the most critical aspect of a longer timeline is gear integration. This is the process of making your equipment an extension of your body. For climbers over 40, allowing sufficient time for this phase is paramount to preventing blisters, hotspots, and muscle strains. You need to practice essential skills like tying knots or adjusting crampons while wearing the gloves you’ll use on the mountain. A dedicated, structured timeline for integrating and testing your gear is the best way to build confidence and ensure system integrity.
- Months 1-2: Focus on breaking in your boots. Start with short walks and progressively increase the distance and pack weight on varied terrain to identify and mitigate any hotspots before they become serious problems.
- Months 3-4: Begin practicing technical skills with your full kit. Practice crampon attachment, self-arrest drills, and rope work while wearing your climbing gloves to build muscle memory under realistic conditions.
- Month 5: Conduct a full gear shakedown. Plan an overnight trip that mimics the conditions of your goal, carrying the exact pack weight and using all the systems you intend to rely on.
- Month 6: Use this final month for minor adjustments to your kit, final confidence-building climbs, and focused rest and recovery before your expedition.
Your journey to 4000m begins not in the store, but with a thorough and intelligent audit of your gear systems. Use this guide as your framework to build a kit that is safe, efficient, and truly valuable, ensuring your investment is in knowledge and preparedness, not just equipment.