The choice between roof repair and replacement isn’t about patching a leak—it’s about securing your home’s structural integrity for the next two decades.
- Surface issues like worn shingles often mask deeper, systemic failures like a sagging ridge line or widespread deck rot, which demand a full replacement.
- The true expense of a roof is its lifecycle cost, not the upfront price; factors like material longevity, energy savings, and insurance discounts often make replacement the smarter long-term investment.
Recommendation: Prioritize a professional structural assessment to understand the root cause of damage before committing to a short-term, cosmetic fix that could prove far more costly later.
That persistent water stain on your ceiling or a few loose shingles in the yard can trigger immediate concern. For most homeowners, the first instinct is to ask, “Can this be patched?” It’s a question driven by a desire for a quick, affordable solution. The common advice is to repair minor issues and replace an old or severely damaged roof. This approach, however, often overlooks the most critical factor: the roof is not just a cosmetic covering but a complex structural system responsible for protecting your entire home.
Focusing solely on the visible symptom—the leak—is like treating a cough without checking the lungs. The real decision isn’t about repair versus replacement; it’s about surface wear versus systemic failure. While a simple patch might stop the dripping for now, it does nothing to address underlying issues like a compromised ridge, saturated decking, or inadequate insulation that may be silently causing far greater damage. The key isn’t to just stop the leak, but to understand why it started.
This guide shifts the focus from the short-term fix to the long-term investment. We will explore the critical indicators of structural problems, analyze the true lifecycle cost of different roofing materials, and debunk common but dangerous “shortcuts.” By the end, you will be equipped to make an informed, 20-year decision based on the health of your home’s entire structure, not just the cost of a temporary patch.
text
For those who prefer a visual overview, the following video showcases the transformative impact of a professional roof replacement, illustrating how a new system can elevate both the protection and aesthetics of a home.
text
To help you navigate this critical decision, we’ve structured this article to address the key technical and financial questions. The following sections break down the most important factors, from identifying true structural failure to planning your project for maximum value.
Summary: A Homeowner’s Guide to the Roof Repair or Replace Dilemma
- Why a Sagging Ridge Line Indicates Structural Failure, Not Just Shingle Wear?
- Asphalt vs Metal: Which Roof Material Offers Lower Lifecycle Cost?
- The Risk of Adding a Second Layer of Shingles Over an Old Roof
- How to Seal Chimney Flashing Permanently to Stop Leaks?
- When to Schedule Roof Replacement to Avoid Peak Season Labor Rates?
- When to Re-waterproof Your Gore-Tex Gear to Restore Breathability?
- The Mistake of Using Thin Insulation That Makes the Attic Unbearable in Summer
- Attic Living Space Conversion: Adding Square Footage Without Compromising Roof Structure?
Why a Sagging Ridge Line Indicates Structural Failure, Not Just Shingle Wear?
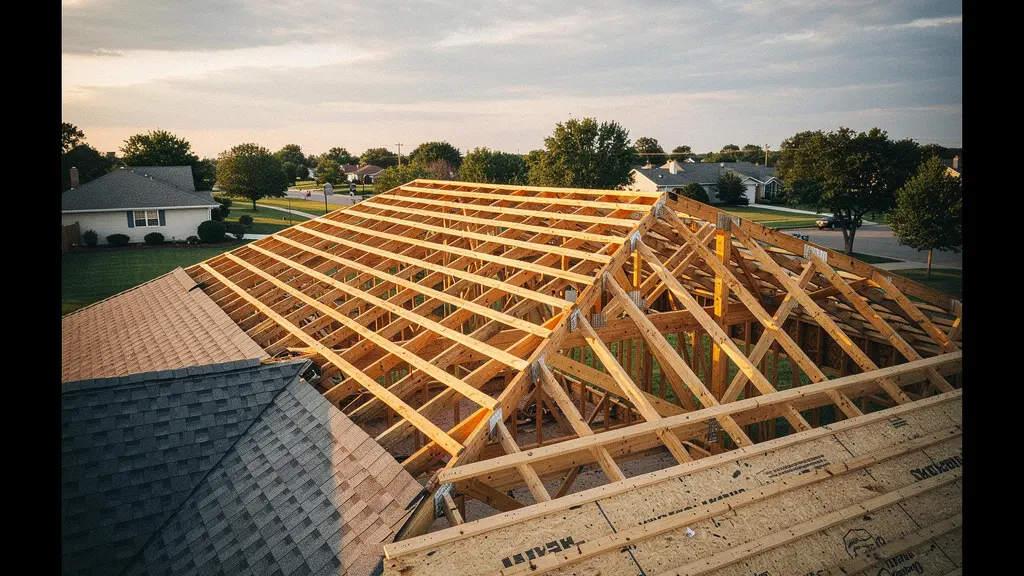
A sagging roof is one of the most alarming signs a homeowner can see, and it should never be dismissed as simple aging or shingle wear. The ridge line—the peak of your roof—is a primary structural element. When it begins to droop, it signals a foundational problem within the roof’s framework. Unlike cosmetic issues, a sag indicates that the rafters or trusses holding up the roof are failing, often due to water damage, excessive weight, or undersized framing materials. Recent structural assessments confirm that dips of several inches or more indicate major structural compromise requiring immediate professional intervention.
The danger extends beyond the roof itself. A sagging ridge creates a domino effect throughout the house. As the roof structure weakens and shifts, it exerts immense outward pressure on the exterior walls, causing them to bow. A documented case study of a farmhouse in New York State tracked this exact progression, showing how an initial sag in the ridge line led to the rafters pushing out the tops of the walls, culminating in a complete structural collapse over several years. This proves that a sagging roof is not a localized problem but a threat to the entire home’s stability.
Attempting a cosmetic fix, like re-shingling over a sagging structure, is profoundly dangerous. It adds more weight to an already failing system and masks the severity of the underlying issue, allowing rot and structural decay to worsen unseen. The only correct course of action is a full structural evaluation by a qualified professional to diagnose the root cause and determine the necessary reinforcements or replacements for the frame before a new roof is installed.
Action Plan: What a Professional Roof Audit Looks For
- Attic Inspection: The first step is to get inside the attic to directly examine the ridge board and rafters for any bowing, cracking, or signs of deflection. Measurements are taken to quantify the severity of the sag.
- Water Damage Assessment: The inspector will search for tell-tale signs of moisture intrusion, such as water stains on the underside of the roof decking, active drips, and the presence of mold or mildew on wood members.
- Exterior Evaluation: From the outside, the inspector documents the visible sag and checks for related damage, such as cracked, curled, or missing shingles that may have been compromised by the structural movement.
- Root Cause Analysis: The goal is to determine why the roof is failing. Is it due to the natural aging of the structure, an excessive load from past snow or overlays, or chronic water damage that has rotted key supports?
- Load Path Impact: Finally, the assessment must evaluate how the roof’s failure is affecting the rest of the house, specifically checking the walls directly beneath the sagging areas for signs of bowing or stress.
Asphalt vs Metal: Which Roof Material Offers Lower Lifecycle Cost?
When facing a full roof replacement, the choice of material is a critical long-term financial decision. While asphalt shingles have a lower upfront installation cost, this initial saving can be misleading. A true cost assessment requires looking at the total lifecycle cost, which includes not just installation but also lifespan, maintenance, energy efficiency, and end-of-life value. From this perspective, metal roofing often emerges as the more economical choice over its 30- to 70-year lifespan.
Metal roofs excel in durability and longevity, lasting two to three times longer than a typical asphalt roof. This extended lifespan means you avoid the cost and hassle of a second replacement down the line. Furthermore, metal roofing offers tangible benefits that reduce ongoing homeownership costs. Its superior heat reflectivity can significantly lower summer cooling bills, and many insurance companies offer discounts for its high resistance to wind, hail, and fire. In contrast, asphalt shingles absorb more heat and offer standard insurance rates.
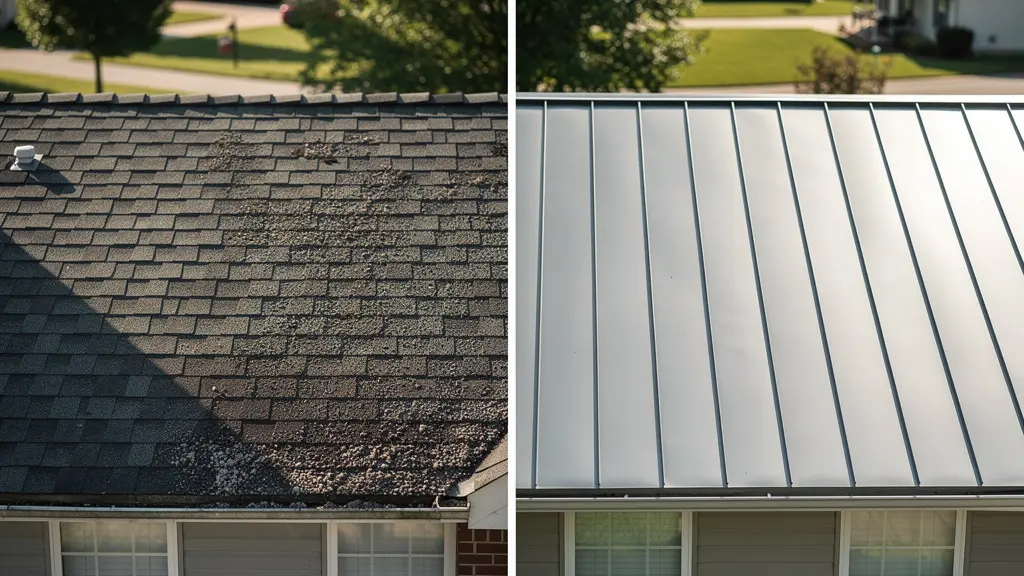
As the comparison above visually demonstrates, the difference in material degradation is stark. Even the end-of-life calculation favors metal; old metal panels have significant scrap value, whereas asphalt shingles contribute to landfill waste and incur disposal fees. This comprehensive financial picture is essential for making a sound 20-year decision.
The following table, based on a 20-year total cost analysis, breaks down the key financial differences between the two most common roofing materials.
| Cost Factor | Asphalt Shingles | Metal Roofing |
|---|---|---|
| Average Lifespan | 15-25 years | 30-70 years |
| Initial Installation | Lower cost | Higher upfront cost |
| Insurance Benefits | Standard rates | Often discounted for impact resistance |
| End-of-Life Value | Landfill disposal costs | Significant scrap metal value |
| Energy Efficiency | Standard insulation | Superior heat reflection, lower cooling costs |
The Risk of Adding a Second Layer of Shingles Over an Old Roof
A “roof-over” or “overlay”—installing a new layer of asphalt shingles directly on top of the old one—is often presented as a cost-saving shortcut. However, this practice is a significant gamble with your home’s structural integrity and is prohibited by building codes in many areas for good reason. The primary danger is weight. A single layer of shingles can weigh 250 to 450 pounds per square (100 square feet). Adding a second layer introduces up to 2 lbs per square foot of additional dead load that your roof’s structure was likely not designed to support. Over time, this immense weight can stress rafters and contribute to the very sagging you want to avoid.
Beyond the weight, an overlay creates a “moisture sandwich” that can have catastrophic consequences. Any existing moisture on the old roof or small, undetected leaks get trapped between the two layers with no way to dry out. This constant dampness dramatically accelerates rot in the wooden roof deck beneath. The problem remains completely hidden from view until a major failure occurs, such as a section of the roof collapsing into the attic. A detailed analysis of overlay failures documented multiple cases where this trapped moisture voided manufacturer warranties, leaving homeowners with no recourse when both layers and the rotted decking required emergency removal at a much higher cost.
Finally, a roof-over is a purely cosmetic fix that prevents a proper inspection. It’s impossible to assess the condition of the roof deck, check for soft spots from rot, or properly install new ice and water shields when the old shingles are in the way. A full tear-off is the only professional method that allows for a thorough inspection and ensures all components of the new roofing system—from the decking to the underlayment and flashing—are installed correctly for maximum longevity and protection.
How to Seal Chimney Flashing Permanently to Stop Leaks?
Leaks around a chimney are one of the most common roofing problems, and homeowners often turn to caulk or roofing cement for a quick fix. This is a critical mistake. While sealants can provide a temporary patch, they will inevitably fail. The true, permanent solution to sealing a chimney is not chemical but mechanical: a properly installed, multi-part metal flashing system that uses physics to divert water, not a temporary chemical bond.
As experts from the Erie Home Roofing Guide note, a reliance on sealants is a losing battle against the elements. As they state in their 2025 guide:
Sealants like caulk are temporary maintenance items due to thermal expansion/contraction. The true ‘permanent’ solution is properly installed mechanical flashing that relies on physics, not chemistry.
– Professional Roofing Standards, Erie Home Roofing Guide 2025
A professional flashing system is a masterclass in water management. It consists of several interwoven pieces. First, step flashing is woven into the shingle courses along the sides of the chimney. Then, counter-flashing is cut and embedded directly into the chimney’s mortar joints, overlapping the step flashing. This creates a two-layer barrier where water running down the chimney is directed over the shingles, never underneath. For wide chimneys, a small peaked structure called a cricket is built behind it to divert water around the sides. This intricate system works by gravity and water deflection, ensuring a durable, watertight seal that moves with the structure and lasts as long as the roof itself.
When to Schedule Roof Replacement to Avoid Peak Season Labor Rates?
Beyond the “what” and “how” of a roof replacement, the “when” plays a major role in the final cost. Most homeowners react to a leak, forcing them to find a contractor during the busiest times—late spring through fall—when demand is high and so are the prices. Strategic planning is your most powerful tool for cost control. Acting proactively, rather than reactively, can lead to substantial savings. Industry pricing analysis shows that advance scheduling of 6-9 months can yield significant savings versus paying the emergency premiums charged during peak season.
The best time to secure a contract for a roof replacement is typically during the contractor’s off-season: late fall and winter. While the work itself may be scheduled for early spring, negotiating and signing the contract during these slower months gives you maximum leverage. A case study of New England roofing companies revealed that homeowners who locked in fixed-price contracts during winter for spring installation secured rates 15-25% below peak summer pricing. This strategy works because it allows you to capitalize on two factors: material suppliers often offer year-end discounts, and contractors are eager to fill their spring schedule, making their labor rates more competitive.
Planning ahead also provides the invaluable benefit of time. Instead of rushing to hire the first available roofer during an emergency, you have ample time to thoroughly vet multiple contractors, check references, and negotiate terms without pressure. This thoughtful approach not only saves you money but also dramatically increases the likelihood of a high-quality installation from a reputable professional, turning a stressful expense into a well-managed home improvement project.
When to Re-waterproof Your Gore-Tex Gear to Restore Breathability?
While a roof system is far more complex than a piece of high-tech outerwear, the principle of performance degradation holds true. Just as a waterproof jacket loses its effectiveness over time, certain components of your roof are designed as “wear items” that require periodic attention. Confusing the failure of one of these small parts with a systemic roof failure is a common and costly mistake for homeowners.
A prime example is the flexible rubber boot that seals the plumbing vents protruding from your roof. These boots are constantly exposed to UV rays and extreme temperatures, causing them to become brittle and crack over a period of 10-15 years. A cracked boot is a frequent cause of small, isolated leaks, yet the fix is simple and inexpensive: replacing the boot itself. It does not signal the need for a full roof replacement.
Similarly, “nail pops”—where roofing nails back out slightly and lift the shingle above them—can create a pathway for water. This is often caused by the natural expansion and contraction of the roof deck. Reseating the nail and sealing the shingle is a straightforward repair. Recognizing these issues for what they are—minor maintenance items—is key. It allows you to address the specific point of failure efficiently, saving you from the unnecessary expense and stress of a full replacement, and reserving that decision for when true, widespread structural issues arise.
The Mistake of Using Thin Insulation That Makes the Attic Unbearable in Summer
A roof’s performance is not just about keeping water out; it’s also about managing heat. A common but critical mistake is to neglect the attic insulation, which functions as the primary thermal barrier between your living space and the roof deck. Inadequate insulation creates an inferno in your attic during the summer, with temperatures easily soaring above 150°F (65°C). This extreme heat has severe consequences for your roof’s structure and your energy bills.
This trapped superheated air effectively “cooks” your roof from the inside out. It accelerates the degradation of the asphalt shingles, causing them to become brittle and lose their protective granules prematurely. Worse, it can cause the wooden roof decking to warp and delaminate. Building science analysis has shown that when combined with poor ventilation, this intense heat creates a perfect environment for moisture to become trapped, leading to mold and rot in the roof trusses. For proper protection, modern building standards specify R-38 or higher insulation levels in most climates to create an effective thermal break.
A poorly insulated attic also places a massive strain on your air conditioning system, forcing it to run constantly to combat the heat radiating down through your ceilings. Upgrading your attic insulation during a roof replacement is one of the most cost-effective improvements you can make. It not only extends the life of your new roof but also provides immediate and significant savings on your energy bills, enhancing the overall comfort and health of your home.
Key Takeaways
- A sagging ridge line is a sign of structural failure, not cosmetic wear, and requires immediate professional assessment to prevent further damage to your home’s walls.
- True roof cost is measured by its lifecycle, not the upfront price. Metal roofing often provides a better long-term return on investment through longevity, energy savings, and insurance benefits.
- Shortcuts like shingle overlays add dangerous weight, trap moisture that causes rot, and prevent proper inspection of the roof deck, making a full tear-off the only professional choice.
Attic Living Space Conversion: Adding Square Footage Without Compromising Roof Structure?
Converting an attic into a living space is an attractive way to add square footage, but it is a major structural project that must be approached with extreme caution. The decision hinges entirely on the original construction of your roof’s framework. Simply laying down a floor and putting up drywall without a structural assessment is a recipe for disaster. The existing frame was likely designed to support only the weight of the roof itself, not the “live loads” of people, furniture, and building materials.
The type of framing is the first and most critical consideration. As the Structural Engineering Institute points out in their guidelines, there is a fundamental difference between traditional rafters and modern trusses:
Conventional attics built with rafters are far easier and cheaper to convert than those built with engineered trusses, which often cannot be modified without compromising the entire roof structure.
– Structural Engineering Institute, Residential Roof Load Analysis Guidelines
Rafter-built roofs create a more open space and can often be reinforced to handle the additional weight. Engineered trusses, on the other hand, are a complex web of wood interconnected with metal plates, designed as a single, unchangeable unit. Cutting even one piece of a truss can compromise the integrity of the entire roof. Any conversion project, regardless of frame type, requires a full structural analysis by a licensed engineer. They will calculate the new dead loads from materials and live loads from occupancy to determine what reinforcements are necessary to ensure the structure remains safe and sound.
Ultimately, viewing your roof as an integrated system is the key. Making the 20-year decision requires looking past the immediate leak and assessing the structural health, long-term material performance, and overall system integrity. For a comprehensive evaluation of your roof’s condition and a clear path forward, obtaining a professional structural assessment is the essential next step.