An attic conversion is far more than a cosmetic update; it is a fundamental structural project that re-engineers your home’s load path from the roof down.
- Ceiling joists are not floor joists and almost always require reinforcement to carry the “live load” of furniture and people.
- Building codes regarding ceiling height and egress are non-negotiable and dictate the true “habitable volume” of the space.
Recommendation: Consult a structural engineer before any demolition to assess joist spans, load paths, and foundation capacity.
For a growing family, the walls of a beloved home can start to feel like they’re closing in. The need for an extra bedroom, a home office, or a playroom often leads to a single, tantalizing thought: converting the attic. That vast, empty space under the roof seems like a reservoir of untapped potential, a straightforward solution to a pressing need. The common advice revolves around adding windows for light and finishing the walls, treating it as a simple interior design project.
However, from a structural architect’s viewpoint, that space is anything but empty. It’s a precisely balanced system of tension and compression that holds your roof up and keeps your walls from bowing outwards. Treating it as “found space” is the single most common and costly mistake a homeowner can make. An attic conversion is not about decoration; it’s about transforming a non-load-bearing structure into a safe, legal, and comfortable habitable floor. This requires a deep understanding of structural loads, regulatory codes, and the intelligent use of space.
This guide moves beyond the paint colors and furniture choices to focus on the foundational decisions that define a successful conversion. We will dissect the non-negotiable rules of habitable space, the critical engineering required to make the floor safe, and the spatial strategies that integrate the new level into your home seamlessly, ensuring your expansion adds value without compromising the very structure that supports it.
To navigate this complex project, we’ve broken down the core architectural and structural considerations you must address. The following sections will guide you through the critical questions, from legal height requirements to long-term roof integrity.
Summary: The Structural and Spatial Guide to Attic Conversions
- Why Your Attic Might Be Illegal to Convert Due to Ceiling Height Rules?
- How to Locate a New Staircase Without Ruining the Floor Plan Below?
- Dormer Window or Velux: Which Adds More Usable Floor Space?
- The Mistake of Using Thin Insulation That Makes the Attic Unbearable in Summer
- How to Strengthen Ceiling Joists to Carry the Weight of a Living Space?
- Why a Sagging Ridge Line Indicates Structural Failure, Not Just Shingle Wear?
- Why a Window with a Low U-Value Keeps Your Feet Warm in Winter?
- Structural Roof Repair vs Replacement: Making the 20-Year Decision?
Why Your Attic Might Be Illegal to Convert Due to Ceiling Height Rules?
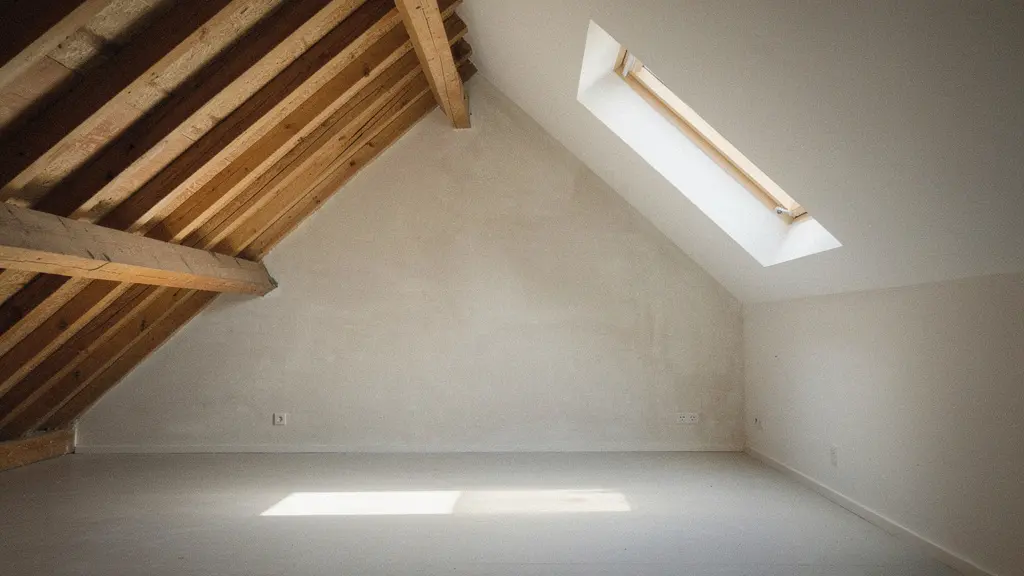
The first and most definitive test of an attic’s potential is not its square footage, but its “habitable volume.” This is a legal definition, not an aesthetic one. Building codes exist to ensure that living spaces are safe, comfortable, and functional. A low, cramped attic fails on all three counts, which is why strict rules on ceiling height are the initial gatekeeper for any conversion project. Simply finishing the space without meeting these codes means you have created an expensive storage area, not a legal bedroom.
The core requirement is that a significant portion of the attic must have sufficient height to allow an adult to stand and walk comfortably. For a space to be considered habitable, most building codes typically require a 7-foot ceiling height over at least 50% of the floor area. Furthermore, the total qualifying floor area (often measured where the ceiling is at least 5 feet high) must meet a minimum threshold, usually around 70 square feet. This combination prevents homeowners from claiming a tiny, sloped closet as a room.
These regulations directly impact the project’s feasibility. If your roof pitch is too shallow, you may not have the required central height. Raising the roof is a massive structural undertaking and often prohibitively expensive. Therefore, precise measurement is the first non-negotiable step before a single dollar is spent on design. This initial audit separates wishful thinking from viable architectural projects.
Action Plan: Verify Your Attic Meets Legal Height Requirements
- Measure Usable Area: Identify and measure the total floor area where the ceiling height is 5 feet or more. This is your potential “usable area.”
- Check Minimum Size: Confirm that this usable area is at least 70 square feet. If it’s less, the space cannot be considered habitable.
- Verify Full Height: Within that usable area, calculate the square footage where the ceiling is 7 feet or higher. This portion must be at least 50% of the total usable area.
- Assess Natural Light: Measure the total window area. It must equal at least 8% of the usable floor space to meet natural light requirements for a habitable room.
- Confirm Ventilation: Ensure the portion of the windows that can be opened for ventilation equals at least 4% of the usable floor space.
How to Locate a New Staircase Without Ruining the Floor Plan Below?
Once you’ve confirmed the attic has the necessary volume, the next spatial puzzle is access. A staircase is not just a utility; it’s a major architectural intervention that fundamentally alters the floor plan it departs from and the one it arrives at. Poor placement can create awkward circulation patterns, consume valuable living space on the floor below, and make the entire home feel disjointed. The goal is to make the new staircase feel intentional, as if it were always part of the home’s design.
The ideal location aligns with the existing “spatial sequence” of your home, typically branching off a central hallway. This minimizes disruption to existing rooms. Placing a staircase in the corner of a living room, for example, can sever the space and create dead zones. From a structural perspective, a staircase requires cutting a significant opening in the ceiling joists of the floor below. This opening must be framed with headers and trimmers to redistribute the load, an operation that requires careful planning to avoid compromising structural integrity.
As the image shows, the intersection of the new staircase and the existing floor framing is a critical structural moment. The choice of stair type is a trade-off between space efficiency and comfort. While a spiral stair consumes the least square footage, its narrow treads can be impractical for daily use or moving furniture. A traditional straight-run or L-shaped stair is more user-friendly but demands a larger footprint.
Case Study: Central Staircase Integration
In a ranch house conversion, the project’s success hinged on stair placement. By locating the new staircase centrally, just off the kitchen and leading up from a main circulation path, it felt fully integrated. This decision made the new attic suite feel like an original part of the home’s layout, rather than a disconnected afterthought, preserving the flow and function of the main floor.
A successful design carefully weighs these factors, often using a central hallway or an underutilized closet as a starting point. This maintains the integrity of the primary living areas while creating a natural and intuitive path to the new upstairs space.
The trade-offs between different stair designs are significant, impacting both budget and the functionality of the floor below. The following comparison breaks down the spatial requirements.
| Stair Type | Floor Space Required | Width Requirement | Best Location |
|---|---|---|---|
| Straight-Run | 40-45 sq ft | 36 inches minimum | Central hallway |
| L-Shaped | 35-40 sq ft | 36 inches minimum | Corner placement |
| Spiral | 20-26 sq ft | 26 inches minimum | Tight spaces |
| Ship/Ladder | 15-20 sq ft | 20 inches | Storage access only |
Dormer Window or Velux: Which Adds More Usable Floor Space?
Windows in an attic conversion do more than just provide light; they can fundamentally alter the perceived and actual volume of the space. The choice between a roof window (like a Velux) and a dormer is not just aesthetic, but a strategic decision about creating usable floor space. While both bring in natural light, only one actively increases the room’s habitable volume.
A roof window is the simpler, less expensive option. It is installed flush with the existing roofline, providing excellent overhead light. However, it does nothing to change the interior geometry of the room. The ceiling still slopes down, limiting the area where you can comfortably stand. It illuminates the space you have but doesn’t create more of it.
A dormer, on the other hand, is a structural projection from the roof. It is essentially a small room with a vertical window built out from the sloping roof plane. This has a transformative effect on the interior space. Salter Stairs, in their “Complete Attic Conversion Guide,” highlights this unique advantage:
Dormer windows are windows that are built to project vertically from a sloped roof, making them ideal for attics. They allow a lot of natural light to come into the space. Because the window projects out, it also creates space in your attic.
– Salter Stairs, The Complete Attic Conversion Guide
By creating a pocket of full-height ceiling, a dormer turns a previously unusable sloped area into valuable floor space where you can place a desk, a chair, or simply stand and look out the window. This is particularly crucial in attics with steep roof pitches where much of the floor area is compromised by low ceilings. While significantly more expensive, a well-placed dormer can be the key to unlocking a truly functional and spacious room.
The Mistake of Using Thin Insulation That Makes the Attic Unbearable in Summer
An attic is the part of a house most exposed to the elements. In summer, the sun beats down on the roof, and in winter, heat rises and escapes through it. Creating a comfortable living space in this environment requires establishing a robust thermal envelope. The most common mistake homeowners make is underestimating the amount and type of insulation required, leading to a room that is sweltering in August and frigid in January, rendering it virtually unusable for much of the year.
Thin or improperly installed insulation is a recipe for failure. The goal is to create a continuous, airtight barrier that resists heat transfer. This involves more than just stuffing some fiberglass batts between the rafters. Best practices demand a multi-faceted approach. First, the right R-value of insulation for your climate zone must be installed, filling the entire cavity to prevent thermal bridging. Spray foam insulation is often preferred in attics as it creates an airtight seal in one step.
Second, proper ventilation is critical. A continuous air gap, typically from the soffit vents at the eaves to a ridge vent at the peak, must be maintained between the insulation and the roof sheathing. This allows air to circulate, carrying away excess heat in the summer and preventing moisture buildup that can lead to rot and mold in the winter. Finally, a radiant barrier—a thin, reflective layer—can be added to the underside of the roof rafters to reflect solar heat gain, significantly reducing the cooling load in summer. Skimping on any part of this system to save a few hundred dollars on insulation will cost thousands in future energy bills and result in a deeply uncomfortable space.
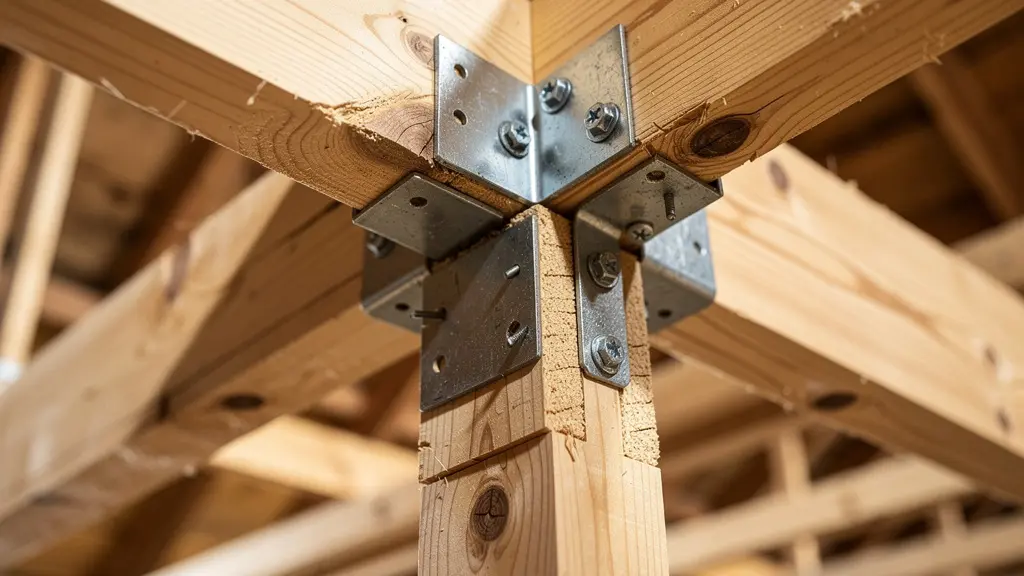
How to Strengthen Ceiling Joists to Carry the Weight of a Living Space?
The most critical structural error in an attic conversion is assuming the existing ceiling joists of the floor below can serve as floor joists for the new room. They cannot. Ceiling joists are typically designed only to support the weight of the drywall below and to act as tension ties, preventing the exterior walls from spreading. They were never intended to support the “live load” of people, furniture, and fixtures.
To become a floor, the structure must be engineered to safely support a minimum live load of 30 pounds per square foot, in addition to the “dead load” of the building materials themselves. Attempting to build a room on undersized joists will result in excessive bounce, sagging floors, and, in the worst-case scenario, catastrophic structural failure. Reinforcement is not optional; it is a fundamental requirement for safety and code compliance.
The most common method for strengthening joists is “sistering,” which involves bolting or nailing new joists of the same or greater depth alongside the existing ones. This effectively doubles the strength and stiffness of the floor system. The new joists must be properly sized by a structural engineer based on their span (the distance they cross without support) and spacing. In some cases, if the span is too great for standard lumber, engineered I-joists or even a steel beam may be required to carry the load without excessive deflection.
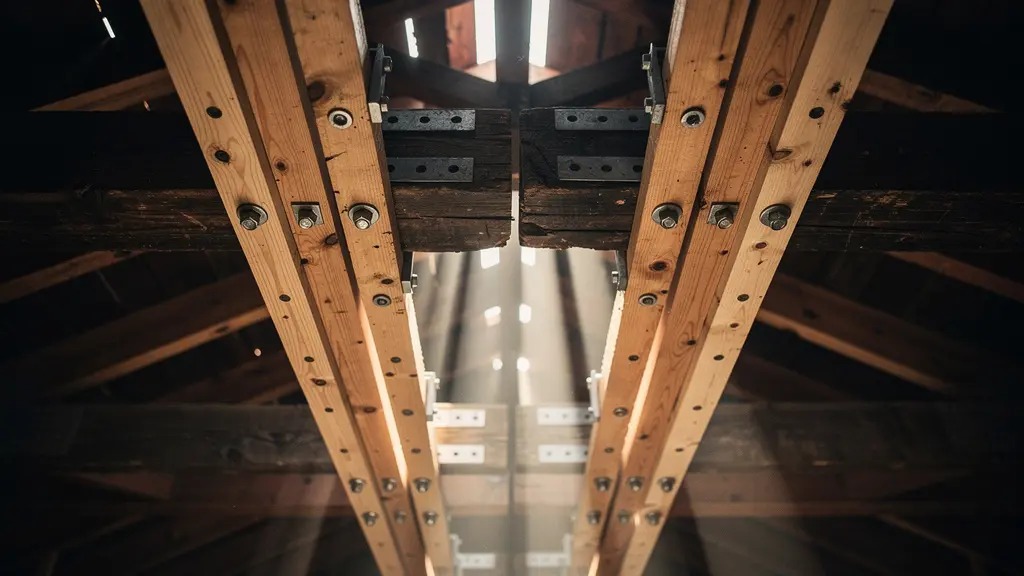
As this image illustrates, sistering creates a robust new floor frame capable of handling the demands of a living space. This work forms the true foundation of the attic room. Before any walls are framed or floors are laid, the load-bearing capacity of the floor system must be solved. It is the invisible work that makes the visible part of the project possible and safe.
Why a Sagging Ridge Line Indicates Structural Failure, Not Just Shingle Wear?
A straight, crisp ridge line is the hallmark of a healthy roof. When that line begins to sway or dip, it is a serious alarm bell that should never be ignored. Homeowners often mistake a sagging ridge for a cosmetic issue, like old shingles or worn sheathing. In reality, it is almost always a symptom of a fundamental structural failure within the roof’s framework.
A roof is essentially a large triangle. The rafters form the two angled sides, and the ceiling joists of the attic form the horizontal base, tying the bottom of the rafters together. This tension from the joists is what prevents the weight of the roof from pushing the exterior walls outwards. As one structural engineering expert explains, the mechanics are straightforward and critical:
A sagging ridge means the base of the triangle (the exterior walls) is spreading apart because the horizontal ties (ceiling joists or collar ties) have failed or are missing.
– Structural Engineering Expert, Attic Conversion Structural Assessment
This can happen for several reasons. During a previous renovation, someone may have carelessly cut or removed the ceiling joists to create an open, vaulted ceiling without providing an alternate structural ridge beam. The rafters themselves may be undersized for their span, causing them to bow under their own weight. Or, in older homes, the foundation may have settled, causing the walls to spread apart. Whatever the cause, a sagging ridge is a sign that the entire load path of the roof is compromised. Continuing with an attic conversion in this state is exceptionally dangerous. All work must stop immediately, and a structural engineer must be consulted to diagnose the cause and design a repair, which often involves installing proper collar ties, a structural ridge beam, or reinforcing the rafters.
Why a Window with a Low U-Value Keeps Your Feet Warm in Winter?
In an attic room, windows are not just openings for light; they are significant components of the thermal envelope. Because an attic is so exposed to the elements, the performance of its windows has a dramatic impact on comfort and energy efficiency. The key metric to understand is the U-value (or U-factor). Put simply, U-value measures the rate of heat loss through a window assembly. The lower the U-value, the better the window is at insulating.
In winter, heat naturally flows from warmer to cooler areas. A window with a high U-value acts like a thermal hole, allowing precious interior heat to escape outside. You will feel this as a constant cold draft, and your heating system will work overtime to compensate. A low U-value window, achieved through features like double or triple glazing, low-emissivity (Low-E) coatings, and insulated frames, acts as a much more effective barrier. It keeps the heat inside, where it belongs. This is why you can sit next to a high-performance window in winter and not feel a chill—it keeps your feet, and the rest of the room, warm.
Given that building codes require window area totaling at least 8% of the floor space for natural light, the choice of window performance is not a minor detail. Opting for cheaper, less efficient windows to save money upfront is a classic false economy. The long-term penalty will be paid through higher energy bills and a space that is perpetually difficult to keep comfortable. Investing in low U-value windows is a critical step in creating a truly livable, year-round attic space.
Key Takeaways
- Joist reinforcement is non-negotiable; ceiling joists are designed for tension, not to be a weight-bearing floor.
- Regulatory compliance for ceiling height, egress, and natural light defines whether a space is a legal, habitable room or just storage.
- A complete thermal envelope—combining high R-value insulation, proper ventilation, and low U-value windows—is essential for year-round comfort.
Structural Roof Repair vs Replacement: Making the 20-Year Decision?
When an attic conversion reveals underlying roof issues, such as a sagging ridge, old materials, or inadequate structure, homeowners face a critical decision: repair or replace? A simple repair might seem like the cheaper, faster option, but from a long-term architectural perspective, a full replacement often provides far greater value, especially when creating a new living space directly beneath it. This is a 20-year decision, not a short-term fix.
A repair is a patch. It addresses a specific leak or replaces a small section of damaged sheathing. It does not, however, allow for fundamental improvements to the roof’s structure or energy performance. A full replacement, while more expensive initially, is an opportunity to re-engineer the roof system for its new purpose. This could involve upgrading to rafters with a greater depth to accommodate more insulation, altering the roof pitch to gain more headroom, or integrating a structural ridge beam that eliminates the need for collar ties, opening up the space.
Furthermore, a new roof allows for the installation of a modern, integrated system of underlayment, ventilation, and flashing, all covered by a long-term warranty. This provides peace of mind that the new, expensive living space below is protected. The financial calculus also supports a more comprehensive approach. According to industry data, attic conversions can achieve a return on investment of around 75%, and a new, reliable roof is a major selling point that contributes to that value. Choosing a temporary patch over a long-term solution jeopardizes the entire investment in the conversion.
This table highlights the fundamental differences in scope and outcome between the two approaches when considered in the context of an attic conversion.
| Factor | Repair Only | Full Replacement |
|---|---|---|
| Initial Cost | $3,000-$8,000 | $15,000-$30,000 |
| Suitable for Living Space | Limited/Temporary | Fully Compatible |
| Structural Upgrade Options | None | Complete Redesign Possible |
| Warranty Period | 1-5 years | 20-50 years |
| Energy Efficiency Gains | Minimal | Significant with New Insulation |
To ensure your attic conversion is both beautiful and structurally sound, the essential next step is a professional structural assessment of your home.